Connecting the Product
You can enjoy a richer sound by connecting the sound bar to the wireless subwoofer.
Connecting the wireless subwoofer automatically
After completing installation, the wireless subwoofer will automatically be connected to the sound bar. Connect the sound bar to the subwoofer in the following order.
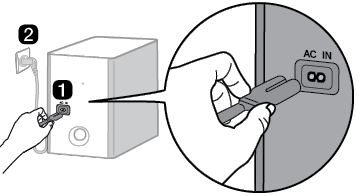
- a Plug the power cable into the wireless subwoofer.
- b Plug the power cable connected to the wireless subwoofer into an outlet.
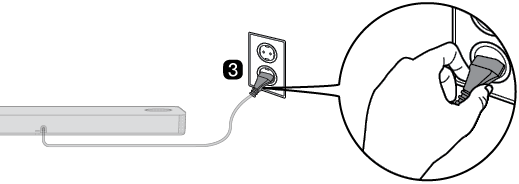
- c Plug the sound bar power cable into an outlet.
|
|
|
|
- d When the connection is automatically established, you will see the LED on the back of the wireless subwoofer light up in green.
Checking the connection with the LED on the back of the wireless subwoofer
You can check the connection status by looking at the LED on the back of the wireless subwoofer.
|
LED Color |
Status |
|
Blinking green |
Connecting in progress |
|
Green |
Connected successfully |
|
Red |
Bad connection, or the subwoofer is in standby |
|
Off |
Power cable not connected |
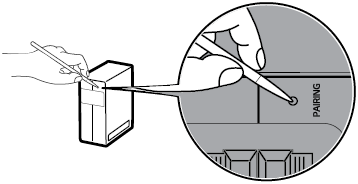
Connecting the wireless subwoofer manually
If you see a red LED on the back of the wireless subwoofer, it means that the sound bar is not connected to the subwoofer. If this is the case, connect them in the following order.
-
a Press the Power
 button on the sound bar to turn it off.
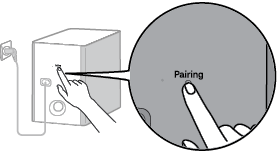
 - b Press the Pairing button on the back of the wireless subwoofer. Check if the LED on the back of the subwoofer is blinking green. If you still see a red LED on the wireless subwoofer, press and hold the button on the back of the subwoofer again.
|
|
-
c Press the Power
 button on the sound bar to turn it on.
 - d When the connection is established, you will see the LED light on the back of the wireless subwoofer light up in green.
|
|
|

Connecting the rear speakers to the wireless receiver (SPK8-S, sold separately)
Automatic connection
After completing installation, the wireless receiver will automatically be connected to the sound bar. Connect the sound bar to the wireless receiver in the following order.
- a Connect the speaker cables to the corresponding terminals on the rear speakers (left, right).
Connect the black striped cable to the negative terminal and the other cable to the positive terminal.
- b Connect the speaker cables on the rear speakers (left, right) to the wireless receiver.
|
Receiver Terminal Color |
Speaker Position |
|
Blue |
L Left rear |
|
Gray |
R Right rear |
|
|
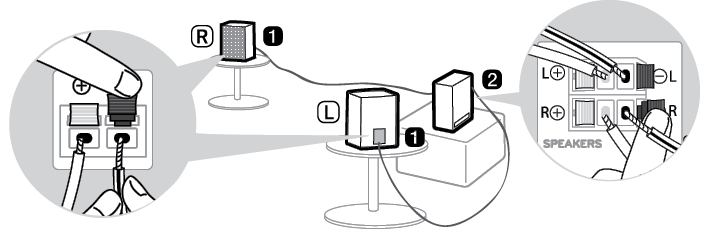
- c Plug the wireless receiver power cable into an outlet.
-
d Press the Power
 button on the sound bar to turn it on.
 - e When the connection is automatically established, you will see the LED on the front of the wireless receiver light up in green.
|
|
|

Checking connection status with the LED color
You can check the connection status with the LED on the front of the wireless receiver.
|
LED Color |
Status |
|
Blinking green |
Connecting In progress |
|
Green |
Connected successfully |
|
Red |
Bad connection, or the receiver is in standby |
|
Off |
Power cable not connected |
If you see a red LED on the front of the wireless receiver, it means that the sound bar is not connected to the receiver. If this is the case, connect them in the following order.
-
a Press the Power
 button on the sound bar to turn it off.
 - b Press the PAIRING button on the back of the wireless receiver. Check if the LED on the front of the wireless receiver is blinking green.
|
|
-
c Press the Power
 button on the sound bar to turn it on.
 - d When the connection is established, you will see the LED light on the front of the wireless receiver light up in green.
|
|
|

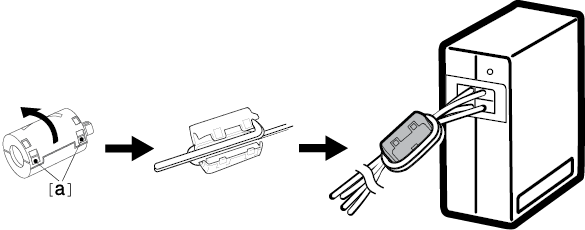
Attaching the ferrite core (optional)
A ferrite core may not be provided depending on national standards.
Attaching the ferrite core to the speaker cables
Attach the ferrite core to the cables to reduce radio noise.
- a Pull Part [a] to open the ferrite core.
- b Wind the wireless receiver's speaker cables twice around the ferrite core.
- c Close the ferrite core until you hear a click.
|
|
Setting up surround sound
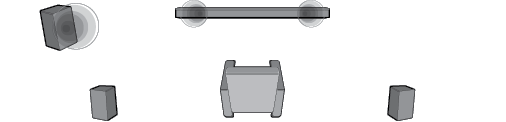
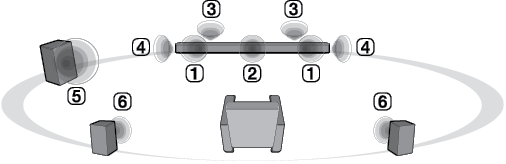
The surround sound function allows you to hear immersive 3D sound produced by multiple audio channels from the speakers, regardless of the channels in the originally recorded content.
For example, if you listen to music recorded in 2.0 channels with standard sound effects while the wireless rear speakers are connected, you can hear the following difference.
|
|
|
When the surround sound is off |
|
|
|
When the surround sound is on |
|
|
|

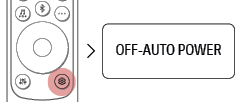
-
a Press Settings
 button. The product enters the setting mode and you can see “OFF-AUTO POWER” or “ON-AUTO POWER”.
|
|
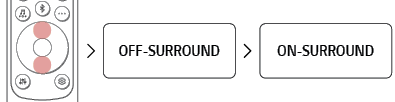
- b While the “OFF-AUTO POWER” or “ON-AUTO POWER” is scrolling in the status display, press Left/Right button to select the surround sound setting. You can see the status of the surround sound, “OFF-SURROUND” or “ON-SURROUND”.
|
|

- c While the “OFF-SURROUND” or “ON-SURROUND” is scrolling in the status display, press Up/Down button to turn on or off the surround sound.
|
|
Speaker sound based on input channels
|
Sound Effects |
Input |
Output |
||
|
Rear speakers not connected |
Rear speakers connected |
|||
|
AI SOUND PRO Sound customized with artificial intelligence |
2.0 channels |
|
|
|
|
5.1 channels |
DTS |
|
|
|
|
Other |
|
|||
|
7.1 channels or more |
|
|
||
|
STANDARD Sound enriched with MERIDIAN technology |
2.0 channels |
|
|
|
|
5.1 channels |
DTS |
|
|
|
|
Other |
|
|||
|
7.1 channels or more |
|
|
||
|
MUSIC Dynamic sound similar to a concert hall |
2.0 channels |
|
|
|
|
5.1 channels |
DTS |
|
|
|
|
Other |
|
|||
|
7.1 channels or more |
|
|
||
|
CINEMA Cinematic 3D sound |
2.0 channels |
|
|
|
|
5.1 channels |
||||
|
7.1 channels or more |
||||
|
CLEAR VOICE Voice sound clear, improving the quality of voice sound |
2.0 channels |
|
|
|
|
5.1 channels |
DTS |
|
|
|
|
Other |
|
|||
|
7.1 channels or more |
|
|
||
|
SPORTS Realistic sound like in a stadium |
2.0 channels |
|
|
|
|
5.1 channels |
DTS |
|
|
|
|
Other |
|
|||
|
7.1 channels or more |
|
|
||
|
GAME Optimized sound for game |
2.0 channels |
|
|
|
|
5.1 channels |
DTS |
|
|
|
|
Other |
|
|||
|
7.1 channels or more |
|
|
||
|
BASS BLAST (BASS BLAST+) Sound with reinforced bass |
2.0 channels |
|
|
|
|
5.1 channels |
||||
|
7.1 channels or more |
||||