Sound Bar Quick Guide
Connecting the Product
Connecting the rear speakers to the wireless receiver
Automatic connection
After completing installation, the wireless receiver will automatically be connected to the sound bar. Connect the sound bar to the wireless receiver in the following order.
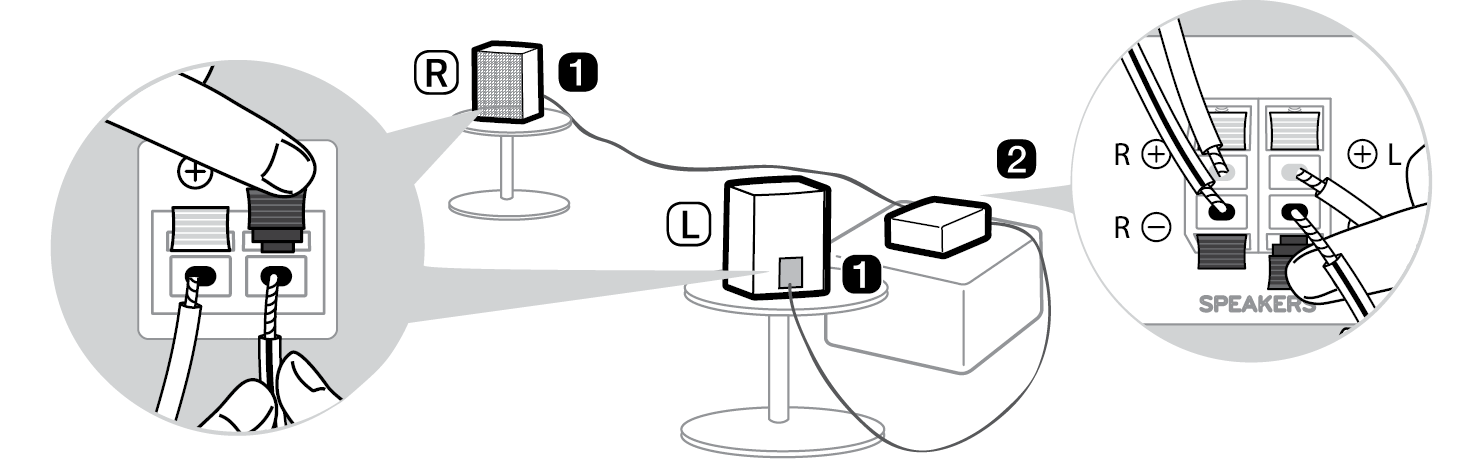
- a Connect the speaker cables to the corresponding terminals on the rear speakers (left, right). Connect the black striped cable to the negative terminal and the other cable to the positive terminal.
- b Connect the speaker cables on the rear speakers (left, right) to the wireless receiver.
|
Receiver Terminal Colour |
Speaker Position |
|
Blue |
L Left rear |
|
Grey |
R Right rear |

- c Plug the power cable into the wireless receiver.
- d Plug the power cable connected to the wireless receiver into an outlet.
-
e Press the Power
 button on the sound bar to turn it on.
 - f When the connection is automatically established, you will see the LED on the front of the wireless receiver light up green.
|
|
|
|
|


Checking connection status with the LED colour
You can check the connection status with the LED on the front of the wireless receiver.
|
LED Colour |
Status |
|
Blinking green |
Connecting In progress |
|
Green |
Connected successfully |
|
Red |
Bad connection, or the receiver is in standby |
|
Off |
Power cable not connected |
If you see a red LED on the front of the wireless receiver, it means that the sound bar is not connected to the receiver. If this is the case, connect them in the following order.
-
a Press the Power
 button on the sound bar to turn it off.
 - b Press the PAIRING button on the back of the wireless receiver. Check if the LED on the front of the wireless receiver is blinking green.


-
c Press the Power
 button on the sound bar to turn it on.
 - d When the connection is established, you will see the LED light on the front of the wireless receiver light up green.
|
|
|
|
|


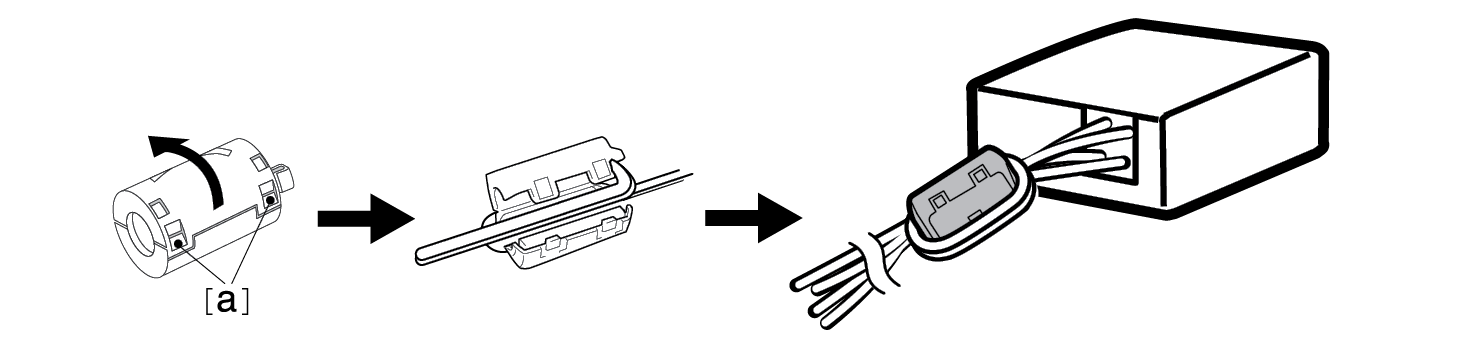
Attaching the ferrite core (optional)
A ferrite core may not be provided depending on national standards.
Attaching the ferrite core to the speaker cables
Attach the ferrite core to the cables to reduce radio noise.
- a Pull Part [a] to open the ferrite core.
- b Wind the wireless receiver's speaker cables twice around the ferrite core. A distance of about 18 cm is required between the wireless receiver and the ferrite core.
- c Close the ferrite core until you hear a click.

Setting up surround sound