Sound Bar Quick Guide
Installing and using the Product
- a Connect the soundbar to your TV via an optical cable or an HDMI cable.
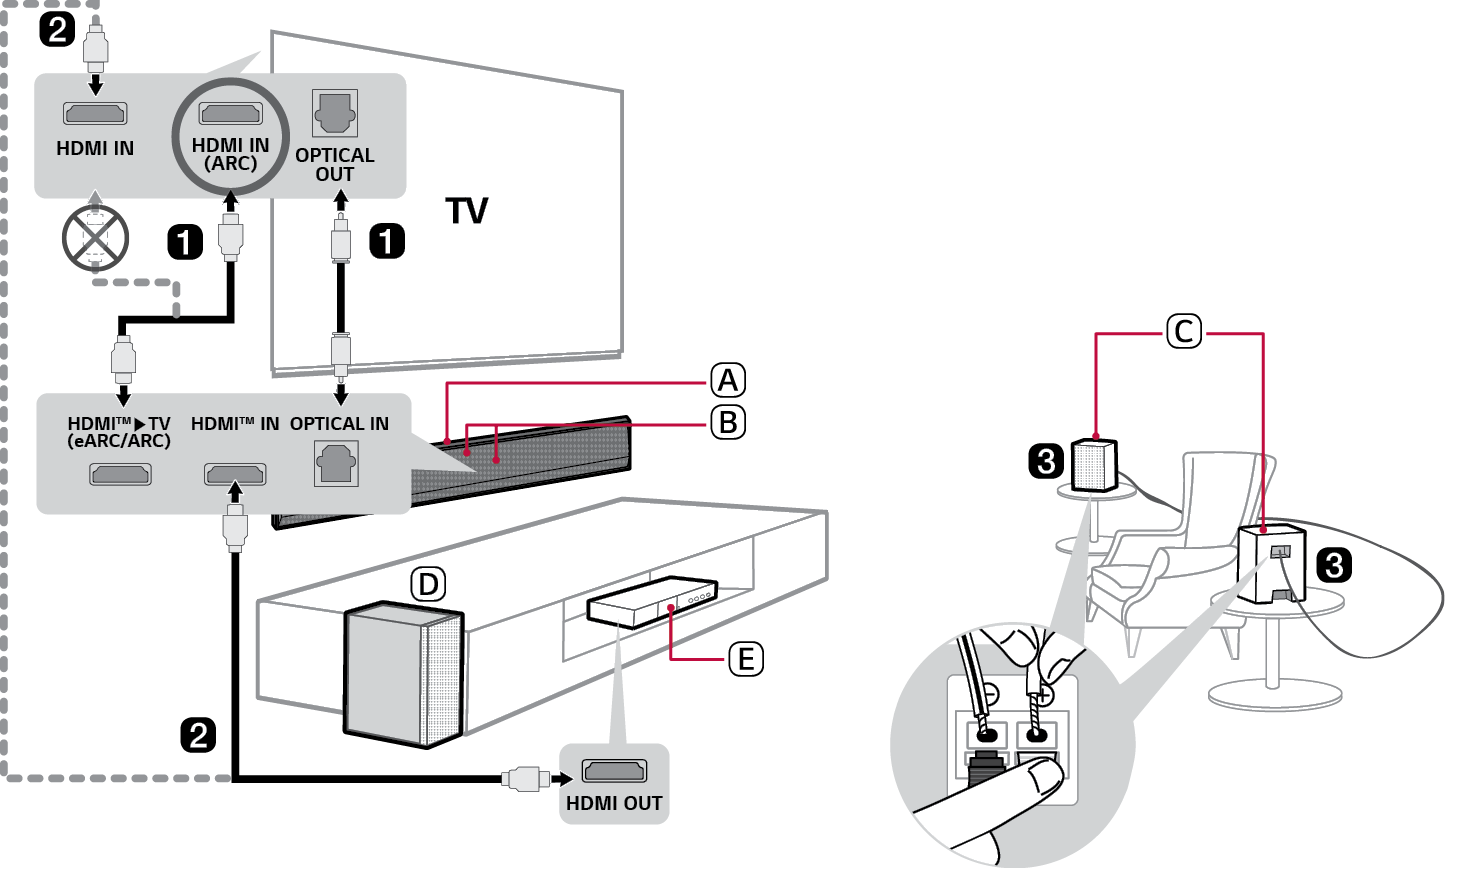

- A Soundbar
- B Remote Control Receiver / Status Display
- C Rear Speakers (Sold separately, SPT8-S)
- D Wireless Subwoofer - Install it close to the soundbar.
- E External Device - (Blu-ray player, game console, etc.)
- b If you are using an external device (ex. Set-top box, Blu-ray player, game console, etc.), connect it to the soundbar or to the TV via an HDMI cable.
- c If you purchased the rear speakers separately, connect the rear speakers via a speaker cable. When connecting the rear speakers, connect the black striped cable to the negative terminal of each speaker and the remaining cable to the positive terminal of each speaker.
- d Connect to power in the following order: wireless subwoofer [ rear speakers [ soundbar. Then, turn on the soundbar. When the connection is automatically established with the soundbar, the LEDs on the wireless subwoofer and the rear speaker will light up green. ([ See “Connecting the Product” on page 6.)
- e Using the product with your TV ([ See “Connecting with an Optical Cable”, “Connecting with an HDMI Cable”, “Connecting via Bluetooth” on page 32, 34, 36.)
-
A Press the Function
 button repeatedly until “OPT/HDMI ARC” appears on the status display.
 - B On your TV's settings, set the output speaker to [HDMI ARC], [Optical], [LG WOWCAST], [External Speaker].
- C When the TV is properly connected to the product, “OPT”, “ARC”, or “E-ARC” will appear on the status display with a sound.
- f Connecting the product to your smartphone via Wi-Fi ([ See “Connecting with the product via LG ThinQ app” on page 16.)
- A Connect your smartphone to Wi-Fi.
- B Install the LG ThinQ app on Google Play or the App Store.
- C Run the LG ThinQ app and follow the instructions.
- D The product will connect to your smartphone and you can control the product with LG ThinQ app.
- g Connecting the product to your smartphone via Bluetooth ([ See “Connecting via Bluetooth” on page 41.)
-
A Tap the Settings
 button on your smartphone and select Bluetooth. Turn on the Bluetooth function. (
 Off >
Off >  On)
On) -
B Press the Bluetooth pair
 button. After a moment, you will see “BT READY” on the status display.
 - C Find and select “LG_Speaker_USG10TY_XXXX”.
- D When the product is connected to your smartphone via Bluetooth, you can see the status display change from “PAIRED” [ “Connected Bluetooth device name” [ “BT”.
Manually connecting the soundbar to the wireless subwoofer or rear speakers ([ See “Connecting the wireless subwoofer manually”, “Manual connection” on page 8, 11.)
If you see a red LED on the wireless subwoofer or rear speaker, it means that the soundbar is not connected to the speakers. If this is the case, connect them in the following order.
-
A Press the Power
 button on the soundbar to turn it off.
 - B Press the PAIRING button on the back of the wireless subwoofer or rear speaker. Check if each LED blinks green.
- If you still see a red LED on the wireless subwoofer, press and hold the button on the back of the subwoofer again.
-
C Press the Power
 button on the soundbar to turn it on.
 - D When the connection is established, you will see a green LED light on the wireless subwoofer or rear speaker light up.
Table of Contents
Soundbar Quick Guide
2 Installing and using the Product
Installation
6 Connecting the Product
12 Enjoying enhanced sound
16 Connecting with the product via LG ThinQ app
17 Installing the LG ThinQ app and registering the product
19 Resetting the Product
Exploring the Product
20 Front
22 Back
23 Exploring Remote Control
Connecting to the TV
32 Connecting with an Optical Cable
34 Connecting with an HDMI Cable
36 Connecting via Bluetooth
Connecting to an External Device
37 Connecting with an HDMI Cable
40 Connecting with an Optical Cable
Using the Product as an Audio System
41 Connecting via Bluetooth
44 Connecting to a USB Storage Device
46 Using the LG ThinQ app
47 Compatible with Google Assistant
48 Works with Apple AirPlay
49 Spotify Connect
50 Works with Alexa
51 Tidal Connect
Mounting the Product to a Wall
52 Checking before mounting to a wall
54 Mounting the Product to a Wall
Safety Precautions
60 Safety and Regulatory
63 Prevention of product misuse
Before Reporting Product Malfunction
67 Troubleshooting
Appendix
73 Specifications
75 Registered Trademarks and Licenses
77 What You Need to Know about Network Services
77 Open Source Software Notice Information
78 Handling the Product
Installation