Sound Bar Quick Guide
Installing and using the Product
- a Connecting the receiver with speakers ([ See “Connecting the speakers” on page 7.)
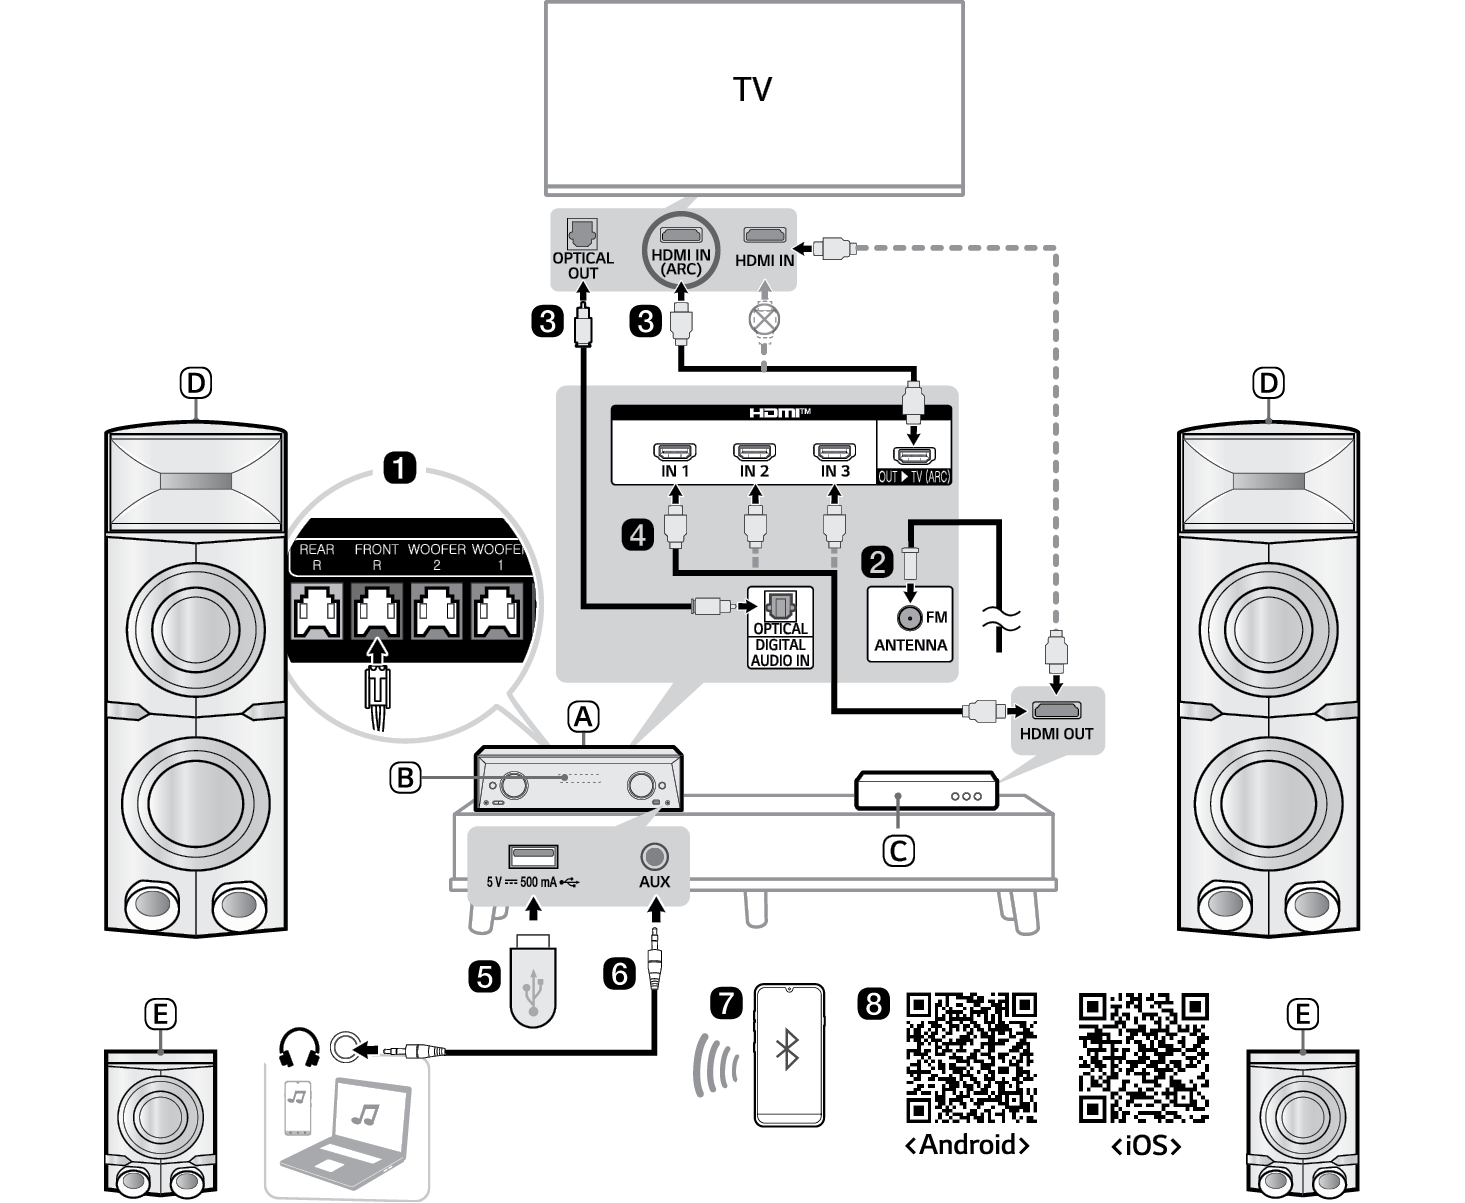

- A Receiver
- B Remote Control Receiver / Status Display
- C External Device - (Blu-ray player, game console, etc.)
- D Front speaker with built in subwoofer
- E Surround (Rear) speaker
- b Connecting the supplied FM antenna ([ See “Connecting Antenna to the receiver” on page 31.)
- c Connecting the receiver to your TV via an optical cable or an HDMI cable. ([ See “Connecting with an Optical Cable”, “Connecting with an HDMI Cable” on page 23, 20.)
-
A Press the Power
 button to turn on the receiver.
 -
B Press the Function
 button repeatedly until “OPT/HDMI ARC” appears on the status display.
 - C On your TV's settings, set the output speaker to [HDMI ARC], [Optical], or [External Speaker].
- D When the TV is properly connected to the product, “OPTICAL”, “ARC” will appear on the status display.
- d If you are using an external device (ex. Blu-ray player, game console, etc.), connect it to the receiver via an HDMI cable. ([ See “Connecting with an HDMI Cable” on page 25.)
- e Playing Music from the USB ([ See “Connecting to a USB Storage Device” on page 45.)
-
A Press the Power
 button to turn on the receiver.
 - B Plug the USB storage device into the USB terminal.
-
C Press the Function
 button repeatedly until “USB” appears on the status display.
 -
D Press the Play/Pause
 button to enjoy the music.
 - f Connecting a Portable Device ([ See “AUX (Portable Input) Connection” on page 30.)
-
A Press the Power
 button to turn on the receiver.
 - B Connect the external device to the AUX terminal via a 3.5 mm stereo cable. Product will automatically recognised when connecting a stereo cable. “AUX” will appear on the status display.
- C Turn the external device on and start playing.
- g Connecting the product to your smartphone via Bluetooth ([ See “Connecting via Bluetooth” on page 42.)
-
A Press the Power
 button to turn on the receiver.
 -
B Tap the Settings
 button on your smartphone and select
  Bluetooth. Turn on the Bluetooth function. (
 Off >
Off >  On)
On) -
C Press the Bluetooth pair
 button on the remote control. After a moment, you will see “BT READY” on the status display.
 - D Find and tap the product on your smartphone. The product appears as “LG-MR11(XX).”
- E When the product is connected to your smartphone via Bluetooth, you can see the status display change from “PAIRED” [ “Connected Bluetooth device name” [ “BT”.
- h Connecting to the LG XBOOM app ([ See “Installing app” on page 53.)
- A Find the LG XBOOM app on the Google Play or App Store and install it on your smartphone.
- B Run the LG XBOOM app and use more features.
Table of Contents
High Power Multimedia Receiver Quick Guide
2 Installing and using the Product
Installation
6 Setting up the speakers
7 Connecting the Product
Exploring the Product
12 Front
14 Back
15 Exploring Remote Control
Connecting to the TV
20 Connecting with an HDMI Cable
22 Connecting via Bluetooth
23 Connecting with an Optical Cable
Connecting to an External Device
25 Connecting with an HDMI Cable
29 Connecting with an Optical Cable
30 AUX (Portable Input) Connection
Radio Operations
31 Connecting Antenna to the receiver
32 Listening to the radio
33 Presetting the Radio Stations
SETTINGS menu
35 Settings and adjustments using the SETTINGS menu
Using the Product as an Audio System
42 Connecting via Bluetooth
45 Connecting to a USB Storage Device
48 Recording to USB
51 Deleting a file/folder or format
Connecting to the LG XBOOM App
53 Installing app
Safety Precautions
55 Safety and Regulatory
57 Prevention of product misuse
Before Reporting Product Malfunction
61 Troubleshooting
Appendix
63 Specifications
65 Registered Trademarks and Licenses
66 Handling the Product
Installation